Tuesday, November 12, 2024

How to Create a Compost Bin in Your Backyard

Create a Compost Bin in Your Backyard

Composting is a fantastic way to reduce waste, enrich your soil, and connect with nature. Creating your own compost bin in your backyard is a rewarding project, and it's surprisingly easy to get started. This article will guide you through the process, step by step.

Choosing Your Compost Bin

The first step is to decide on the type of compost bin you want. There are numerous options available, from simple DIY bins to more elaborate, pre-built models.

DIY Compost Bins

Building your own compost bin allows you to customize the size and materials to your needs. You can use readily available materials like wooden pallets, metal drums, or even old garbage cans. Remember to ensure that the bin is well-ventilated with holes for air circulation.

Pre-Built Compost Bins

If you prefer a more polished look or simply don't have the time or skills for a DIY project, pre-built compost bins are a great alternative. They come in various sizes, materials, and styles, from simple plastic tumblers to stylish wooden bins.

Finding the Perfect Spot

The location of your compost bin is crucial for its success. Choose a spot that receives some shade but also allows for good drainage. Avoid areas with strong winds or direct sunlight, as these can dry out the compost.

Accessibility

Choose a spot that is easily accessible for adding materials and turning the compost. Ideally, it should be located close to your kitchen or garden, minimizing the distance you need to carry your food scraps.

Drainage

Ensure the location you choose has good drainage to prevent the compost from becoming waterlogged. If necessary, consider adding a layer of gravel or sand at the bottom of the bin for drainage.

Building Your Compost Bin

Once you've chosen your bin and location, it's time to start building! This section will provide instructions for constructing a basic DIY compost bin using wooden pallets.

Materials

You will need:

  • Two wooden pallets
  • Screws or nails
  • Drill or hammer
  • Saw (optional, for trimming the pallets)

Steps

Follow these steps to build your compost bin:

  1. Lay the first pallet flat on the ground.
  2. Lay the second pallet on top, perpendicular to the first pallet, creating a 90-degree angle.
  3. Secure the pallets together using screws or nails. You can either attach the pallets directly or use a piece of wood as a spacer for increased air circulation.
  4. If desired, add a third pallet to create a closed bin.
  5. Drill a series of holes in the sides of the bin for ventilation.

Composting Essentials

Now that your compost bin is ready, it's time to learn the basics of composting.

Brown Materials (Carbon)

These provide structure and carbon to your compost pile. Include:

  • Dry leaves
  • Shredded paper
  • Straw
  • Wood chips
  • Sawdust

Green Materials (Nitrogen)

These provide nutrients and nitrogen to your compost pile. Include:

  • Food scraps (fruits, vegetables, coffee grounds, tea bags)
  • Grass clippings
  • Manure (from herbivores only)
  • Hair and fur

Composting Techniques

With your bin ready and materials assembled, you can start composting. Here's a breakdown of the process.

Layering

Create layers of brown and green materials in your bin. Aim for a 2:1 ratio of brown to green materials.

Moisture

Maintain a consistently moist environment, similar to a wrung-out sponge. Add water if the compost feels dry.

Turning

Regularly turning your compost helps to aerate it and promotes decomposition. Aim to turn your compost every week or two.

Harvesting Your Compost

Compost is ready to use when it's dark, crumbly, and has an earthy smell. This process usually takes 2-3 months, but can take longer depending on your climate and the size of your compost pile.

Using Your Compost

Compost is a fantastic soil amendment. You can mix it into your garden beds, potting mix, or use it as mulch. Enjoy the rewards of your hard work!

Conclusion

Composting is a sustainable and eco-friendly practice that benefits your garden and the environment. By following these steps, you can create a thriving compost bin in your backyard and enjoy the benefits of this rewarding process.
Read More..
Easy DIY Compost Bin Ideas for Beginners

Easy DIY Compost Bin Ideas for Beginners: Turn Your Kitchen Scraps into Black Gold

Hey there, fellow gardening enthusiasts! Ready to ditch those overflowing kitchen scraps and turn them into nutrient-rich compost? You're in the right place! This guide will walk you through some super easy and budget-friendly DIY compost bin ideas, perfect for beginners. Forget about buying expensive composting systems â€" we're going for a down-to-earth, hands-on approach.

Why Compost?

Before we dive into the DIY fun, let's talk about why composting is awesome. It's basically magic for your garden! Compost is like a superpower for your plants, giving them a boost of nutrients and improving soil structure. Plus, it's a super sustainable way to reduce waste and lessen your environmental impact.

The Basics of Composting

Think of composting as a happy little ecosystem where microorganisms break down your food scraps and yard waste into rich, dark compost. To keep those microbes happy, we need to create the right environment:

The Golden Ratio: Brown to Green

To achieve that perfect composting balance, we need a good mix of brown and green materials:

  • Browns: Think of these as the "carbon" sources â€" dry, woody materials like:
    • Dead leaves
    • Shredded paper
    • Wood chips
    • Straw
    • Dried grass clippings
    • Sawdust
  • Greens: These are the "nitrogen" sources â€" fresh, juicy materials like:
    • Fruit and vegetable scraps
    • Coffee grounds
    • Tea bags
    • Grass clippings
    • Manure (avoid cat and dog waste)

Aim for a ratio of about 2 parts brown to 1 part green, but don't worry too much about being exact. You'll get the hang of it as you go!

Moisture and Aeration

Composting needs a good amount of moisture, but not soggy! Imagine a damp sponge â€" that's about right. To help with aeration, use a garden fork or shovel to mix things up regularly and allow air to circulate.

Location, Location, Location

Your compost bin needs a sunny spot, but also some shade. Direct sunlight can dry it out too quickly. Choose a spot that's easy to access and near your garden or the place where you'll store your compost.

DIY Compost Bin Ideas: Get Crafty!

1. The Classic Wooden Pallet Bin

This is a super simple and cost-effective option. You can find pallets for free at construction sites or behind businesses.

Here's what you'll need:

  • Two sturdy wooden pallets
  • Screws or nails
  • A drill (optional)

Instructions:

  1. Remove any loose boards or nails from the pallets.
  2. Place the two pallets flat on the ground, facing each other.
  3. Attach the pallets together at the top and bottom using screws or nails.
  4. You can use the pallet slats as dividers to create compartments in your bin.

2. The Easy and Affordable Trash Can Bin

This one's a breeze! You'll be surprised how well a basic trash can works for composting.

Here's what you'll need:

  • A large plastic trash can with a lid (make sure it has holes for drainage)
  • A drill
  • A piece of mesh or chicken wire (optional)

Instructions:

  1. Drill several drainage holes in the bottom of the trash can.
  2. If you want extra aeration, cut a circle of mesh or chicken wire and place it in the bottom of the can before adding the compost.
  3. That's it! You've got your compost bin!

3. The Upcycled Tumbling Compost Bin

Ready for something a bit more creative? This tumbling compost bin is made from repurposed materials and offers great aeration for your compost.

Here's what you'll need:

  • Two large plastic storage bins (the kind you'd get at a home improvement store)
  • Hinges
  • Screws
  • A drill
  • A sturdy piece of wood (optional, for a handle)

Instructions:

  1. Drill drainage holes in the bottom of both storage bins.
  2. Attach the hinges to one side of each bin.
  3. Use screws to secure the bins together at the hinges, making sure they can rotate.
  4. Optionally, attach a piece of wood to the top of the bin as a handle for easy turning.

4. The Simple Three-Bin System

This system is great for keeping your compost organized and at different stages of decomposition. It's a little more involved but well worth it.

Here's what you'll need:

  • Three wooden or plastic containers (trash cans, barrels, etc.)
  • A place to store them (a deck, patio, or a corner of your yard)

Instructions:

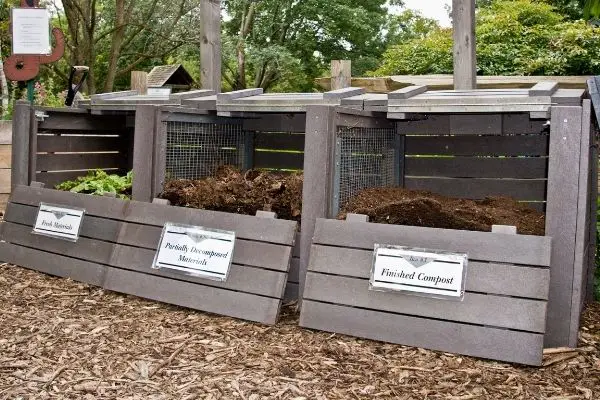
  1. Label your bins as "Bin 1: Active Composting," "Bin 2: Curing," and "Bin 3: Finished Compost."
  2. Start adding kitchen scraps and yard waste to Bin 1.
  3. After a few months, move the contents of Bin 1 to Bin 2 (where it will continue to break down).
  4. When the compost in Bin 2 is fully decomposed (about 6-12 months), you'll have finished compost ready to use in your garden.
  5. Empty Bin 2 into Bin 3, and start fresh with a new batch in Bin 1!

Composting Tips for Success

Here are some additional tips to make your composting journey even more fruitful:

  • Chop it up! Smaller pieces of food scraps and yard waste will break down faster.
  • Keep it moist. Check your compost regularly and add water as needed.
  • Turn it over. This helps with aeration and ensures even decomposition.
  • Avoid meats and bones. These items can attract pests and take a long time to break down. It's best to compost them separately using a worm bin.
  • Don't be afraid to experiment! Composting is a learning process. If something doesn't work, try something else.
  • Enjoy Your Compost!

    Once your compost is ready, it's time to reap the rewards! You'll have a rich, nutrient-rich soil amendment to improve your garden's health.

    Happy composting!

Read More..
How to Build a Compost Bin with Free Printable Plans

Build Your Own Compost Bin: Free Plans Included!

Hey there, fellow green thumb! Are you tired of throwing away all those kitchen scraps and yard waste? It's time to join the composting revolution and turn your organic matter into nutrient-rich black gold for your garden. Building your own compost bin is a fun, rewarding project, and it's surprisingly easy, especially with these free printable plans.

Composting is not just about saving money on fertilizer. It's about reducing waste, contributing to a healthier environment, and creating a cycle of life in your own backyard. So, grab your tools, get ready to get your hands dirty, and let's embark on this composting adventure together!

Why Build a Compost Bin?

Before we jump into the construction, let's take a moment to appreciate the amazing benefits of composting. Why should you build a compost bin and embrace this earth-friendly practice?

  • Reduce waste: Say goodbye to overflowing trash cans. Composting helps you divert food scraps and yard waste from landfills, which reduces methane emissions and contributes to a cleaner planet.
  • Save money: Compost is like liquid gold for your garden. It's a natural and effective fertilizer that replaces expensive store-bought options, saving you a pretty penny in the long run.
  • Improve your soil: Compost adds valuable nutrients and improves soil structure, leading to healthier plants and a thriving garden. It's like giving your plants a super boost!
  • Close the loop: Composting is all about recycling and completing the circle of life. You're taking organic matter, transforming it into a resource, and returning it to the Earth to nurture new growth. It's a beautiful cycle!

Choosing the Right Compost Bin Design

There are many different types of compost bins available, from simple tumblers to elaborate three-bin systems. Let's explore a few popular options to find the perfect fit for your needs and space:

Tumbler Compost Bin

This option is a favorite for its simplicity and ease of use. Tumbler bins are typically made of durable plastic or metal and feature a rotating mechanism for mixing and aerating the compost. They are compact, ideal for smaller spaces, and relatively easy to turn for consistent decomposition. However, they might be more expensive than other options.

Three-Bin Compost System

This system promotes a more controlled and efficient composting process. It typically consists of three bins: one for "green" materials (kitchen scraps, fruit, vegetable waste), one for "brown" materials (dried leaves, straw, twigs), and a final bin for finished compost. This system allows for a continuous composting process as you move materials between the bins.

DIY Pallet Compost Bin

For those who love a rustic charm, the DIY pallet compost bin is a popular choice. Pallet wood is readily available, often for free, and can be easily assembled into a simple yet functional compost bin. It offers a natural, earthy look and allows for easy access to the compost material. Be sure to choose pallets that haven't been treated with harmful chemicals.

Essential Materials and Tools

Before you start building, gather the following materials and tools to ensure a smooth composting journey:

  • Wood: Select sturdy, weather-resistant wood like cedar, redwood, or pressure-treated lumber. Consider using reclaimed wood to add a touch of sustainability.
  • Screws: Use galvanized or stainless steel screws for durability.
  • Measuring tape: For precise cuts and assembly.
  • Saw: A circular saw or handsaw will be handy for cutting the wood to size.
  • Drill: To pre-drill holes for the screws and create ventilation holes in the bin.
  • Level: To ensure your compost bin is stable and level.
  • Safety glasses and gloves: Always protect your eyes and hands when working with tools and wood.

Download Your Free Printable Plans

Now, let's get to the fun part - building your own compost bin! We've created free printable plans for two popular compost bin designs: a classic four-sided bin and a more elaborate three-bin system. These plans include detailed measurements, diagrams, and step-by-step instructions to guide you through the process:

  • [Link to download the four-sided compost bin plans]
  • [Link to download the three-bin compost system plans]

Step-by-Step Instructions

Once you've downloaded your plans, let's dive into the construction process. These instructions are general, but refer to your specific plan for precise measurements and details.

1. Cut the Wood

Use your saw to cut the wood pieces to the dimensions specified in the plans. Be sure to make precise cuts for a sturdy and well-fitting bin.

2. Drill Ventilation Holes

Drill a series of ventilation holes in the bottom and sides of the bin. These holes allow for air circulation, which is essential for the composting process.

3. Assemble the Frame

Using your drill, secure the wooden pieces together to form the frame of the bin. Pre-drilling holes before screwing can prevent wood splitting.

4. Add a Bottom

If your plan includes a bottom for the bin, attach it to the frame using screws. You can also choose to place a layer of landscaping fabric or chicken wire on the bottom for better drainage.

5. Optional Extras

If you wish, you can add extra features to your compost bin, such as a lid, a door for easy access, or a handle for turning. These elements can enhance your composting experience.

6. Finish and Place

Once your compost bin is assembled, you can give it a final touch by applying a sealant or paint. Choose a non-toxic option that is safe for your garden. Place your bin in a shady spot with good drainage.

Filling and Maintaining Your Compost Bin

Congratulations, you've built your own compost bin! Now, let's talk about filling it and maintaining it for optimal composting action:

  • Balance the "Greens" and "Browns": To ensure successful composting, maintain a balanced ratio of "green" materials (nitrogen-rich) and "brown" materials (carbon-rich). A good rule of thumb is a 2:1 ratio of browns to greens.
  • Layer the Materials: Don't just throw everything in! Create layers of green and brown materials, alternating them to promote even decomposition.
  • Add Water: Compost needs moisture, so add water regularly, ensuring it's moist but not soggy.
  • Turn the Compost: Turning your compost regularly helps aerate it and speeds up the decomposition process. Aim to turn it at least once a week.
  • Monitor Temperature: Compost needs to reach a certain temperature to break down effectively. The ideal temperature range is between 130 and 160 degrees Fahrenheit. You can monitor the temperature with a compost thermometer.
  • Patience is Key: Composting is a process that takes time. It can take anywhere from a few weeks to several months for your compost to fully mature, depending on the materials and composting method.

Enjoy the Benefits of Your DIY Compost

There you have it! Building your own compost bin is a rewarding project that will bring you countless benefits. From reducing waste and saving money to improving your soil and nurturing a thriving garden, composting is a win-win situation.

Don't be afraid to experiment with different composting methods and techniques. The beauty of composting is that it's a personalized process. Embrace the journey, learn as you go, and enjoy the magical transformation of organic matter into nutrient-rich compost.

Happy composting!

Read More..
Download Free Plans for a Vintage DIY Bedside Cabinet

Unlock the Charm of Vintage DIY Bedside Cabinets: Free Plans Included!

Okay, picture this: You're cozying up in bed with a good book and a cup of tea. Beside you, a charming, vintage-style bedside cabinet sits, holding your reading glasses, a comforting lamp, and maybe even a stash of your favorite chocolates. Doesn't that just feel *right*?

The good news? Creating that perfect bedside haven doesn't have to be a complicated, expensive endeavor. With a little DIY magic and the right plans, you can build your very own vintage-inspired bedside cabinet that fits your style and your budget.

Ready to dive in? Grab your tools and get your creative juices flowing - it's time to build a piece you'll cherish for years to come.

Finding the Perfect Vintage Vibe

The beauty of vintage style is its versatility. There's a vibe for everyone, from the rustic charm of farmhouse chic to the sleek elegance of mid-century modern. Before you start hammering and sawing, consider the overall feel you want to achieve.

  • Rustic Farmhouse: Think reclaimed wood, distressed finishes, and simple, functional designs. A touch of farmhouse charm can be achieved with exposed wood grain, metal accents, and a hint of weathered patina.
  • Mid-Century Modern: This style embraces clean lines, minimalist details, and a focus on natural materials like walnut or teak. Look for tapered legs, geometric shapes, and a restrained color palette.
  • Industrial Chic: Metal, exposed pipes, and a raw, unfinished look are the hallmarks of industrial style. Consider incorporating elements like reclaimed metal, exposed screws, and a bold, dark color scheme.
  • Shabby Chic: This style leans into the beauty of imperfections, with soft colors, distressed finishes, and romantic accents. Think delicate floral patterns, feminine curves, and a gentle, weathered look.

Once you've chosen your desired vintage aesthetic, it's time to find the right plans to match your vision.

Exploring Free Vintage Bedside Cabinet Plans

The internet is a treasure trove of free DIY plans, offering a wide range of designs and styles to fit your skill level and preferences. Here are some great resources to get you started:

  • Ana White: Ana White's website is a DIYer's paradise, with numerous free plans for furniture, including a variety of bedside cabinets. Her plans are well-detailed and easy to follow, making them ideal for beginners.
  • The Spruce: The Spruce features a collection of free DIY furniture plans, including some gorgeous vintage-inspired bedside cabinet ideas. They offer a mix of styles, from farmhouse chic to minimalist modern.
  • Pinterest: Pinterest is a visual goldmine for DIY inspiration. Search for "vintage bedside cabinet plans" or similar terms and explore the endless array of ideas. You'll find plans from individual creators as well as curated collections.
  • YouTube: Many DIY enthusiasts share their projects and build instructions on YouTube. Search for tutorials like "DIY vintage bedside cabinet" or "build a bedside table from scratch" and discover helpful step-by-step guides.

Don't be afraid to mix and match ideas from different plans to create a truly unique piece that reflects your individual style.

Choosing the Right Materials

The materials you choose will play a big role in the overall look and feel of your bedside cabinet. Here's a guide to popular options and their characteristics:

  • Reclaimed Wood: This sustainable choice adds character and a touch of history to your project. Reclaimed wood can vary in color, texture, and size, lending a unique rustic appeal.
  • Pine: A budget-friendly option that's easy to work with. Pine has a soft, pale color and a slightly knotty texture that complements a vintage aesthetic.
  • MDF (Medium-Density Fiberboard): A versatile and affordable choice that's often used for cabinet doors and shelves. MDF can be stained or painted to achieve various looks.
  • Plywood: A strong and durable option that offers excellent stability. Plywood is available in different thicknesses and veneers, allowing you to choose a look that suits your project.
  • Metal: Adding metal accents to your cabinet can create an industrial feel. Consider using metal legs, handles, or even a metal frame for a modern touch.

Remember to choose materials that match your chosen vintage style and consider factors like durability and cost.

Adding Vintage Details: The Finishing Touches

Once the construction is complete, it's time to add those vintage touches that will make your bedside cabinet truly special. Here are some ideas to elevate your project:

  • Distressing: Create a vintage look by distressing the wood with sandpaper, a wire brush, or even a hammer. This technique creates a worn, weathered appearance that adds character and charm.
  • Staining: Choose a stain color that complements your chosen vintage style. Consider warm, earthy tones for farmhouse chic, cool grays or browns for mid-century modern, and dark, rich hues for industrial chic.
  • Painting: Paint your cabinet with chalk paint, milk paint, or even a high-quality acrylic paint. For a vintage touch, consider layering colors or creating a chipped paint effect.
  • Hardware: Vintage-style hardware can make a big difference. Look for antique-inspired drawer pulls, door knobs, and hinges. You can find these at antique stores, flea markets, or online retailers specializing in vintage hardware.
  • Stencils: Add a touch of pattern and detail with stencils. Consider floral motifs, geometric designs, or even simple text for a personalized touch.

Don't be afraid to experiment and have fun with the finishing touches. Let your creativity flow and personalize your vintage bedside cabinet to reflect your unique style.

The Joy of Building Your Own Vintage Cabinet

Building your own vintage bedside cabinet isn't just about creating a functional piece of furniture - it's about embracing the joy of crafting something special, something that reflects your taste and personality. With a little time, effort, and these free plans, you can create a timeless treasure that will be enjoyed for generations to come.

Read More..
Build a Simple Cold Frame: PDF Plans Included

Building a Simple Cold Frame: PDF Plans Included

A cold frame is a simple, inexpensive structure that can extend your gardening season by providing a protected environment for seedlings, transplants, and even overwintering plants. By trapping solar heat and shielding plants from harsh weather, a cold frame can help your garden thrive in the cooler months.

This guide will walk you through the steps of building a simple cold frame using readily available materials. We'll provide detailed instructions, a list of tools and materials, and downloadable PDF plans to help you get started.

Benefits of Using a Cold Frame

Cold frames offer numerous advantages for gardeners, including:

  • Extended Growing Season: Cold frames create a microclimate that allows you to start seeds and transplant seedlings earlier in the spring and extend the growing season into the fall.
  • Protection from Harsh Weather: The structure provides a barrier against wind, rain, and frost, safeguarding delicate plants from damage.
  • Improved Seed Germination and Growth: The controlled environment within the cold frame promotes optimal temperatures for seed germination and plant growth.
  • Reduced Watering Needs: The closed environment of a cold frame helps retain moisture, reducing the need for frequent watering.
  • Cost-Effective and Easy to Build: Cold frames are relatively inexpensive to construct and can be built using readily available materials.

Choosing the Right Location and Size

Before you start building, consider these factors when choosing the location and size of your cold frame:

Location

  • Sunlight: Select a spot that receives at least 6 hours of direct sunlight daily. Ideally, the cold frame should face south to maximize solar gain.
  • Drainage: Ensure the chosen location has good drainage to prevent waterlogging, which can damage plants.
  • Accessibility: Choose a site that is easily accessible for working and tending to your plants.

Size

The size of your cold frame will depend on your needs and available space. Consider these factors:

  • Number of Plants: Determine the number of plants you intend to grow in the cold frame.
  • Available Space: Ensure the cold frame will fit comfortably in your chosen location.
  • Ease of Use: Consider the size and weight of the cold frame when determining whether it will be easy to move or lift for cleaning or maintenance.

Materials and Tools

Here's a list of the materials and tools you'll need to build a simple cold frame:

Materials

  • Wooden Framing: Use pressure-treated lumber for the frame to ensure durability and resistance to rot. Consider using 2x4s or 2x6s for the sides and 2x4s for the top.
  • Glazing Material: Choose a clear material to allow sunlight to penetrate the cold frame. Options include polycarbonate sheets, glass panes, or even clear plastic sheets.
  • Hinges: Use heavy-duty hinges to secure the lid to the frame.
  • Screws and Fasteners: Use galvanized screws and fasteners for durability and rust resistance.
  • Soil and Growing Medium: Choose a well-draining potting mix or garden soil that is appropriate for your plants.

Tools

  • Saw: Use a circular saw, chop saw, or hand saw to cut the wood framing.
  • Drill: Use a drill with a screw driver attachment to secure the framing and glazing material.
  • Level: Ensure the frame is level for proper drainage and support.
  • Measuring Tape: Accurately measure the dimensions of your cold frame.
  • Safety Glasses and Gloves: Protect your eyes and hands while working with tools and wood.

Step-by-Step Construction Guide

Follow these steps to build your simple cold frame:

Step 1: Cut the Wood Framing

Using your saw and measuring tape, cut the wood framing to the desired dimensions. Refer to the provided PDF plans for specific measurements. Cut the following pieces:

  • Four side pieces: These pieces will form the sides of the cold frame. Cut them to the desired height.
  • Two top pieces: These pieces will form the top of the cold frame. Cut them to the desired length.

Step 2: Assemble the Frame

Using your drill and screws, assemble the frame by attaching the side pieces to the top pieces. Make sure the corners are square and secure. Use your level to ensure the frame is level and stable.

Step 3: Attach the Glazing Material

Secure your chosen glazing material to the frame using screws or other appropriate fasteners. For polycarbonate sheets or glass panes, you may need to use glazing clips or silicone sealant to create a secure and watertight seal.

Step 4: Install Hinges and Lid

Install the hinges on one side of the frame, attaching the lid to the frame using screws. Ensure the lid opens smoothly and securely.

Step 5: Prepare the Base

Prepare the base of the cold frame by removing any weeds or debris. You can add a layer of gravel or landscape fabric to improve drainage.

Step 6: Fill with Soil and Planting

Fill the cold frame with your chosen soil or potting mix. Plant your seedlings or transplants, ensuring adequate spacing for optimal growth. Water your plants thoroughly.

Maintaining Your Cold Frame

Once your cold frame is built, follow these maintenance tips to ensure your plants thrive:

  • Ventilation: Open the lid on sunny days to allow air circulation and prevent overheating. On cooler days or nights, close the lid to trap warmth.
  • Watering: Water your plants regularly, checking the soil moisture levels. Avoid overwatering, as this can lead to root rot.
  • Pest and Disease Control: Monitor your plants for pests and diseases. Take steps to control any problems promptly. You can use a combination of natural methods and approved pesticides, if necessary.
  • Cleaning: Clean the inside of your cold frame periodically to remove debris and prevent disease buildup.
  • Winter Protection: If you plan to overwinter plants in your cold frame, protect them from extreme cold by using a layer of straw or other insulating materials.

Downloading PDF Plans

To download the PDF plans for building a simple cold frame, please visit our website [Link to website]. The plans include detailed drawings and measurements to help you construct a successful cold frame.

By building your own cold frame, you can extend your gardening season, protect your plants, and enjoy the benefits of a thriving garden year-round. Happy gardening!

Read More..
DIY Plans for a Stylish Squirrel Box

DIY Stylish Squirrel Box

Transform your backyard into a charming haven for furry friends with a DIY squirrel box. This project combines practicality with aesthetics, providing a safe and stylish shelter for these playful creatures. Let’s dive into creating a squirrel box that blends seamlessly with your outdoor décor.

Materials You'll Need

Before you embark on your squirrel box construction, gather the essential materials:

  • Wooden planks (1x6 or 1x8 inches)
  • Wood glue
  • Wood screws
  • Hammer
  • Measuring tape
  • Pencil
  • Saw (hand saw or circular saw)
  • Sandpaper
  • Paint or stain (optional)
  • Weather-resistant sealant (optional)
  • Entrance hole saw (optional, for creating the entrance)
  • Screwdriver
  • Safety goggles

Step-by-Step Guide

1. Design and Dimensions

Start by sketching a basic design for your squirrel box. Consider the size you'd like, and remember that squirrels typically prefer boxes with a floor area of around 12 x 12 inches and a height of 12-16 inches. Measure and mark the wooden planks according to your chosen dimensions.

2. Cut the Pieces

Using a saw, cut the wooden planks to the precise lengths you marked. Take your time and make clean, accurate cuts for a well-constructed box. You'll need to cut pieces for the sides, bottom, back, and roof. The top of the box will need two pieces.

3. Assemble the Box

Now, it's time to bring your squirrel box to life! Begin by assembling the bottom and sides of the box. Apply wood glue to the edges of the planks, then secure them together with screws. Make sure the screws are long enough to penetrate through both planks. Next, attach the back piece.

4. Create the Entrance

Next, add the entrance for your furry residents. You can achieve this in two ways. You can use an entrance hole saw to create a perfectly rounded opening, or you can simply cut a square or rectangular hole using a hand saw. If you're using a saw, ensure it's a bit smaller than the desired opening as you'll later sand down the edges.

5. Build the Roof

To make the roof, attach two planks to the back wall of the box. They should extend out over the box's sides. This creates a frame for the roof. Then, you can add a flat roof by attaching a board to the top of the frame. The roof should be slightly larger than the box's base to ensure drainage. You may want to consider creating a sloped roof for added water runoff. If you're aiming for a more rustic look, leave the roof flat, with the edges overhanging slightly. This look will allow rain to drain naturally.

6. Attach the Roof

Carefully place the roof on top of the box, aligning the edges with the box's sides. Using wood glue and screws, secure the roof to the back wall of the box.

7. Finishing Touches

Congratulations, you've built the foundation of your squirrel box! Now, it's time to add those finishing touches. Sand down any rough edges and smooth surfaces for a polished look. Next, apply a layer of sealant or primer to protect the wood from the elements. Once it's dry, add a coat of paint or stain, choosing colors that complement your garden's aesthetic.

8. Placement and Installation

Find the perfect spot in your yard to place your squirrel box. Choose a location that's sheltered from harsh weather and provides some shade. Mount the box to a sturdy tree or post using brackets or screws. Make sure it's high enough off the ground to discourage predators.

Tips for a Squirrel-Friendly Box

  • Entrance Size: The entrance hole should be around 3 inches in diameter. This will allow easy entry for squirrels, while discouraging larger animals from entering.
  • Ventilation: Add small ventilation holes to the roof or sides for proper air circulation within the box.
  • Security: To prevent predators from accessing the box, consider adding a small, protective overhang above the entrance hole.
  • Natural Materials: Opt for natural wood for the box, as it provides a better texture and scent for squirrels. Avoid treated wood, as it could be harmful to wildlife.
  • Placement: Choose a location that offers a clear view of the surrounding area, allowing squirrels to feel secure.

Creating a DIY squirrel box is a rewarding project that brings a touch of whimsy and charm to your backyard. While you're crafting your squirrel haven, remember to enjoy the process. Let your creativity flourish as you personalize your design. Soon, you'll be watching adorable squirrels frolic and nest in your stylish creation.

Read More..
How to make a small wooden clock for office decor

Crafting a Rustic Wooden Clock for Your Office

Incorporating handcrafted elements into your workspace can infuse it with personality and warmth. A wooden clock, meticulously crafted with your own hands, not only serves as a practical timekeeper but also acts as a captivating centerpiece, reflecting your creative spirit and adding a touch of rustic charm to your office décor.

This guide will walk you through the process of crafting a small wooden clock, empowering you to create a unique and functional piece for your office. From selecting materials to mastering the techniques, we'll cover every step in detail, ensuring you have a fulfilling and successful DIY experience.

Materials and Tools

Before embarking on this woodworking endeavor, ensure you have the following materials and tools readily available:

Materials

  • Wooden board (approximately 6" x 6" for a small clock)
  • Clock movement mechanism (including hands, a quartz movement, and a battery)
  • Wood stain (optional, depending on your desired finish)
  • Wood glue
  • Sandpaper (various grits)
  • Finishing oil or sealant (optional, for added protection and sheen)
  • Clear coat (optional, for added durability and shine)
  • Clock hands (hour, minute, and second)
  • Screws or nails
  • Pen or pencil
  • Measuring tape
  • Safety glasses
  • Dust mask
  • Gloves

Tools

  • Saw (hand saw, circular saw, or jigsaw)
  • Drill
  • Drill bits (appropriate size for screws or nails)
  • Screwdriver
  • Clamps
  • Sanding block or sander
  • Brush (for applying stain and sealant)
  • Cloth (for wiping away excess stain and sealant)

Preparing the Wooden Board

The foundation of your clock lies in the wooden board. Select a board with a visually appealing grain pattern, ensuring it's free of cracks or defects. The size and shape of the board depend on your design preference, but a square or rectangular board provides a classic and balanced aesthetic.

1. Cutting the Board

Measure and mark the desired size of your clock face on the board using a pen or pencil. Carefully cut the board to the desired dimensions using your chosen saw, ensuring smooth and precise cuts.

2. Sanding the Board

Roughen the edges of the board with coarse-grit sandpaper to prevent splintering. Subsequently, use medium and fine-grit sandpaper to smoothen the entire surface, creating a consistent finish.

Creating the Clock Face

The clock face serves as the visual centerpiece of your creation. Whether you opt for a minimalist design or a more intricate pattern, the clock face sets the tone for the overall aesthetic.

1. Design Consideration

Conceptualize the design you wish to incorporate on your clock face. This could involve simply adding numbers, Roman numerals, or a unique pattern. Alternatively, consider utilizing a stencil for a more intricate design.

2. Transferring the Design

If you're using a stencil, secure it onto the board using painter's tape. If you're drawing freehand, carefully transfer your design using a pen or pencil. Ensure the design is centered on the board for a balanced appearance.

3. Carving or Etching

For a more three-dimensional effect, you can carve the design into the wood using chisels or a wood carving tool. Alternatively, use an etching tool to create a subtle, engraved look.

Installing the Clock Movement Mechanism

The heart of your wooden clock is the clock movement mechanism. This mechanism consists of a quartz movement, hands, and a battery. The installation process is relatively straightforward, but requires precision and care.

1. Determining the Center

Identify the center of the board, which will correspond to the center of the clock face. Mark this point using a pencil or pen.

2. Drilling the Hole

Using a drill bit slightly smaller than the diameter of the clock movement mechanism, drill a hole at the center of the board, ensuring the hole is deep enough to accommodate the mechanism.

3. Securing the Mechanism

Carefully insert the clock movement mechanism into the drilled hole. Depending on the mechanism, you might need to secure it using screws or nails provided. Ensure the mechanism is level and centered within the hole.

Applying a Finish

The final touches are crucial in enhancing the beauty and durability of your wooden clock. This involves applying a suitable finish, which can be a stain, sealant, or clear coat, depending on your preferences.

1. Staining the Wood

If you desire a stained finish, apply a wood stain to the entire surface of the board. Use a brush to evenly distribute the stain, ensuring that all areas are covered. Allow the stain to dry completely before proceeding to the next step. You can apply multiple coats of stain for a deeper color.

2. Sealing the Wood

For added protection and to enhance the natural beauty of the wood, apply a sealant. Sealing the wood creates a barrier against moisture, dirt, and other elements, prolonging the life of your clock. Apply the sealant using a brush, ensuring all surfaces are coated evenly. Allow the sealant to dry completely before proceeding.

3. Applying a Clear Coat

If you prefer a glossy or semi-gloss finish, apply a clear coat. A clear coat can be applied over stained or unstained wood, providing additional protection and shine. Use a brush to apply thin coats of clear coat, allowing each coat to dry completely before applying the next.

Attaching the Clock Hands

Once the finish is dry, carefully attach the clock hands to the mechanism. The hands are typically secured using a small nut or screw. Ensure the hands are positioned correctly, aligning with the corresponding markings on the clock face.

Final Touches

The finishing touches are essential in completing your wooden clock project. These steps add a touch of finesse and polish, bringing your creation to life.

1. Installing the Battery

Insert the battery into the clock movement mechanism, ensuring it's installed correctly according to the polarity markings. Test the clock to ensure it functions properly.

2. Hanging the Clock

If you plan to hang your clock, attach a hanging mechanism, such as a keyhole slot or a hook, to the back of the board. Ensure the mechanism is securely attached and can support the weight of the clock.

3. Adding Personal Touches

To personalize your clock, consider adding embellishments like a small plaque with your name, the date, or a special inscription. You can also incorporate decorative elements like small wooden flowers or beads for a more rustic appeal.

Conclusion

Creating a small wooden clock for your office decor is a rewarding and enriching endeavor. By following these steps, you can craft a unique and functional piece that reflects your creative spirit and personal style. The rustic charm of the wood, combined with the personalized design, will undoubtedly elevate the ambiance of your workspace.

This project serves as a testament to the power of DIY, encouraging you to embrace your creative potential and bring your vision to life. So, gather your materials, don your safety gear, and embark on this exciting woodworking adventure, crafting a piece that will be cherished for years to come.

Read More..