Easy DIY Compost Bin Ideas for Beginners: Turn Your Kitchen Scraps into Black Gold
Hey there, fellow gardening enthusiasts! Ready to ditch those overflowing kitchen scraps and turn them into nutrient-rich compost? You're in the right place! This guide will walk you through some super easy and budget-friendly DIY compost bin ideas, perfect for beginners. Forget about buying expensive composting systems â€" we're going for a down-to-earth, hands-on approach.
Why Compost?
Before we dive into the DIY fun, let's talk about why composting is awesome. It's basically magic for your garden! Compost is like a superpower for your plants, giving them a boost of nutrients and improving soil structure. Plus, it's a super sustainable way to reduce waste and lessen your environmental impact.
The Basics of Composting
Think of composting as a happy little ecosystem where microorganisms break down your food scraps and yard waste into rich, dark compost. To keep those microbes happy, we need to create the right environment:
The Golden Ratio: Brown to Green
To achieve that perfect composting balance, we need a good mix of brown and green materials:
- Browns: Think of these as the "carbon" sources â€" dry, woody materials like:
- Dead leaves
- Shredded paper
- Wood chips
- Straw
- Dried grass clippings
- Sawdust
- Greens: These are the "nitrogen" sources â€" fresh, juicy materials like:
- Fruit and vegetable scraps
- Coffee grounds
- Tea bags
- Grass clippings
- Manure (avoid cat and dog waste)
Aim for a ratio of about 2 parts brown to 1 part green, but don't worry too much about being exact. You'll get the hang of it as you go!
Moisture and Aeration
Composting needs a good amount of moisture, but not soggy! Imagine a damp sponge â€" that's about right. To help with aeration, use a garden fork or shovel to mix things up regularly and allow air to circulate.
Location, Location, Location
Your compost bin needs a sunny spot, but also some shade. Direct sunlight can dry it out too quickly. Choose a spot that's easy to access and near your garden or the place where you'll store your compost.
DIY Compost Bin Ideas: Get Crafty!
1. The Classic Wooden Pallet Bin
This is a super simple and cost-effective option. You can find pallets for free at construction sites or behind businesses.
Here's what you'll need:
- Two sturdy wooden pallets
- Screws or nails
- A drill (optional)
Instructions:
- Remove any loose boards or nails from the pallets.
- Place the two pallets flat on the ground, facing each other.
- Attach the pallets together at the top and bottom using screws or nails.
- You can use the pallet slats as dividers to create compartments in your bin.
2. The Easy and Affordable Trash Can Bin
This one's a breeze! You'll be surprised how well a basic trash can works for composting.
Here's what you'll need:
- A large plastic trash can with a lid (make sure it has holes for drainage)
- A drill
- A piece of mesh or chicken wire (optional)
Instructions:
- Drill several drainage holes in the bottom of the trash can.
- If you want extra aeration, cut a circle of mesh or chicken wire and place it in the bottom of the can before adding the compost.
- That's it! You've got your compost bin!
3. The Upcycled Tumbling Compost Bin
Ready for something a bit more creative? This tumbling compost bin is made from repurposed materials and offers great aeration for your compost.
Here's what you'll need:
- Two large plastic storage bins (the kind you'd get at a home improvement store)
- Hinges
- Screws
- A drill
- A sturdy piece of wood (optional, for a handle)
Instructions:
- Drill drainage holes in the bottom of both storage bins.
- Attach the hinges to one side of each bin.
- Use screws to secure the bins together at the hinges, making sure they can rotate.
- Optionally, attach a piece of wood to the top of the bin as a handle for easy turning.
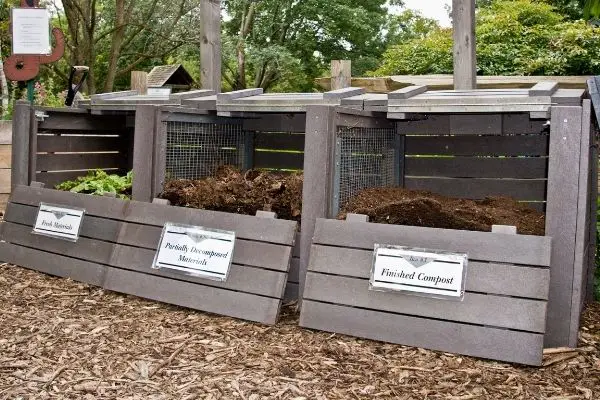
4. The Simple Three-Bin System
This system is great for keeping your compost organized and at different stages of decomposition. It's a little more involved but well worth it.
Here's what you'll need:
- Three wooden or plastic containers (trash cans, barrels, etc.)
- A place to store them (a deck, patio, or a corner of your yard)
Instructions:
- Label your bins as "Bin 1: Active Composting," "Bin 2: Curing," and "Bin 3: Finished Compost."
- Start adding kitchen scraps and yard waste to Bin 1.
- After a few months, move the contents of Bin 1 to Bin 2 (where it will continue to break down).
- When the compost in Bin 2 is fully decomposed (about 6-12 months), you'll have finished compost ready to use in your garden.
- Empty Bin 2 into Bin 3, and start fresh with a new batch in Bin 1!
Composting Tips for Success
Here are some additional tips to make your composting journey even more fruitful:
- Chop it up! Smaller pieces of food scraps and yard waste will break down faster.
- Keep it moist. Check your compost regularly and add water as needed.
- Turn it over. This helps with aeration and ensures even decomposition.
- Avoid meats and bones. These items can attract pests and take a long time to break down. It's best to compost them separately using a worm bin.
- Don't be afraid to experiment! Composting is a learning process. If something doesn't work, try something else.
Enjoy Your Compost!
Once your compost is ready, it's time to reap the rewards! You'll have a rich, nutrient-rich soil amendment to improve your garden's health.
Happy composting!

0 comments:
Post a Comment