Soar into Relaxation: Free Glider Chair Woodworking Plans for Beginners
Dreaming of a relaxing glider chair on your porch, but intimidated by woodworking? Don't be! This article provides free, beginner-friendly plans to guide you through building your own stunning glider. We’ll break down the process into manageable steps, ensuring a rewarding experience from start to finish. Get ready to transform some lumber into a comfortable and stylish addition to your home!

Choosing Your Materials: A Foundation for Success
Before you pick up a saw, carefully select your materials. Durability and quality matter. Opt for well-seasoned wood like pine or cedar, known for their workability and resistance to rot (especially important for outdoor use). Avoid knots and imperfections that could compromise the chair's structural integrity. Consider pre-finished lumber to save time and effort, or embrace the satisfaction of staining and sealing your creation later. This stage sets the tone for your project, so take your time and choose wisely. Your future comfort depends on it!
Essential Materials List:
- Wood boards (specific dimensions depend on your chosen plan, but expect to need various lengths and widths)
- Wood glue
- Wood screws
- Sandpaper (various grits)
- Wood stain or sealant (optional)
- Glider hardware kit (includes runners and mounting brackets)
- Measuring tape
- Saw (circular saw or hand saw)
- Drill
- Screwdriver
- Safety glasses
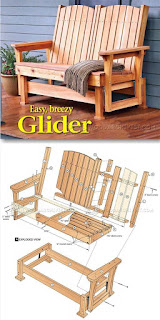
Step-by-Step Construction: Building Your Glider
Numerous free plans are available online; search for "beginner glider chair plans" on sites like Pinterest, Instructables, or Ana White. Many offer detailed diagrams and cut lists. Choose a plan that aligns with your skill level and the tools you possess. Carefully study the plan before starting. Accurate measurements are crucial. Pre-cut all your lumber according to the plan’s specifications. This organized approach minimizes mistakes and maximizes efficiency. Remember, take your time and double-check your measurements frequently.
Assembling the Chair Frame:
Follow the plan's instructions meticulously to assemble the chair's frame. Start with the seat base, carefully attaching the side supports. Use wood glue for strong joints and reinforce them with screws. Ensure all angles are precise, using clamps to hold pieces in place while the glue dries. Take breaks as needed to avoid fatigue and maintain accuracy. A well-built frame provides the foundation for a comfortable and sturdy glider.
Installing the Glider Mechanism:
Once the frame is complete and the glue is dry, it’s time to install the glider mechanism. This typically involves attaching the runners to the base and then mounting the chair's frame onto the runners. Refer to the instructions provided with your glider hardware kit. Precise alignment is essential for smooth gliding. Take your time; this is a key step for the functionality of your chair. A smooth glide is the reward for your careful attention here.
Finishing Touches: Sanding and Finishing
Sand all surfaces thoroughly, starting with coarser grits and progressing to finer ones for a smooth finish. Remove any sawdust before applying stain or sealant, if desired. Follow the manufacturer’s instructions for your chosen finish. This step not only enhances the aesthetic appeal but also protects the wood from the elements (especially vital for outdoor use). Protect your work surface while sanding and staining. Let the finish dry completely before enjoying your new glider.
Enjoy Your Handmade Haven!
Congratulations! You've successfully built your own glider chair. Sit back, relax, and enjoy the fruits of your labor. The satisfaction of crafting something beautiful and functional with your own hands is immeasurable. Remember to always prioritize safety during the construction process. And don't hesitate to share your creation â€" we’d love to see your handiwork!


0 comments:
Post a Comment