Comprehensive Design and Construction Plans for a Picnic Table with Integrated Benches
This document provides detailed plans for the construction of a robust and aesthetically pleasing picnic table featuring integrated benches. The design prioritizes durability, ease of construction for individuals with moderate woodworking skills, and a classic, timeless aesthetic. Detailed dimensions, material lists, and step-by-step instructions are included to facilitate a successful project.
I. Design Specifications and Material Selection

A. Overall Dimensions
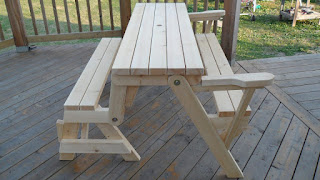
The picnic table will measure 8 feet (96 inches) in length, 36 inches in width, and 30 inches in height. The bench seating on either side will be 16 inches deep and 15 inches high from the ground. These dimensions are optimal for comfortable seating and sufficient table space for a group of four to six people. Adjustments can be made to accommodate specific needs or preferences, but it is recommended to maintain proportional relationships between the table and bench dimensions to preserve structural integrity.
B. Material Selection
The choice of materials significantly influences the table's durability and longevity. Pressure-treated lumber is strongly recommended for its resistance to rot, decay, and insect infestation. Specifically, we suggest using 4x4 pressure-treated lumber for the legs and supports, and 2x6 pressure-treated lumber for the table top and bench seating. All lumber should be kiln-dried to minimize warping and shrinkage. Consider using stainless steel screws and bolts to ensure resistance to corrosion and maximize the table's lifespan. Exterior-grade wood glue will further enhance the structural integrity of the joints.
Material List:
- Four 8-foot long 4x4 pressure-treated lumber posts for legs
- Two 8-foot long 2x6 pressure-treated lumber for the table top supports
- Four 8-foot long 2x6 pressure-treated lumber for bench supports
- Four 6-foot long 2x6 pressure-treated lumber for the bench seating
- Two 6-foot long 2x6 pressure-treated lumber for table top
- Approximately 100 3-inch exterior-grade wood screws
- Approximately 20 4-inch exterior-grade wood screws
- Exterior-grade wood glue
- Stainless steel bolts and washers (size to be determined based on the chosen 4x4 post size)
II. Construction Process
A. Assembling the Leg Assembly
The first step involves creating the leg assembly. Each leg assembly comprises two 4x4 posts joined together using the 2x6 supports. Begin by cutting two 4x4 posts to a height of 30 inches. These will serve as the main support legs. Using a sturdy workbench for stability, carefully drill pilot holes and then attach the 2x6 supports to these posts, ensuring a secure connection with wood glue and long, exterior grade screws. This arrangement creates a strong and stable base for the table.
Important Note: Ensure the 2x6 supports are level and flush before securing them to the posts. Accurate measurement and precise drilling are crucial for a structurally sound assembly. Pre-drilling pilot holes will also help prevent the wood from splitting during screw insertion.
B. Attaching the Tabletop Supports
Once the leg assemblies are completed, the next step involves attaching the supports for the table top. Cut two 8-foot long 2x6 pressure-treated lumber pieces. Place them atop the 2x6 supports already attached to the leg assemblies, ensuring that they are aligned and evenly spaced. Attach these pieces securely using wood glue and screws, creating a level and sturdy platform for the table top. It is vital to make certain that the tabletop supports are parallel to the ground and that the overall assembly is square.
C. Constructing the Bench Supports
The bench supports will be constructed in a similar fashion to the tabletop supports, using the remaining 8-foot long 2x6s. These supports will be attached to the legs in a manner that is parallel to the tabletop supports and appropriately spaced to accommodate the bench seating. Use the previously established measurements to ensure correct positioning and spacing.
D. Attaching the Bench Seating
For the bench seating, cut four 6-foot long 2x6 pressure-treated lumber pieces. Attach these pieces to the bench supports, ensuring they are evenly spaced and securely fastened using wood glue and screws. The end result should be a level and comfortable bench on either side of the table. Consider using countersunk screws to provide a smooth seating surface.
E. Attaching the Table Top
Finally, cut the two 6-foot long 2x6 pieces for the table top. These should be attached to the tabletop supports, ensuring that they are properly aligned and firmly secured with wood glue and screws. The final assembly should be level and stable. Sand all surfaces lightly to smooth any rough edges and splinters.
III. Finishing and Maintenance
Once the construction is complete, it is recommended to apply a weather-resistant sealant to protect the wood from the elements. This will extend the lifespan of the picnic table significantly. Multiple coats are recommended, allowing adequate drying time between applications. Follow the manufacturer's instructions carefully for optimal results.
Regular maintenance is essential for preserving the table's appearance and structural integrity. This involves regular cleaning with soap and water, and occasional reapplication of the sealant as needed. Avoid leaving the table exposed to prolonged periods of extreme weather conditions whenever possible.
IV. Safety Precautions
Always prioritize safety during construction. Wear appropriate safety glasses and work gloves to protect your eyes and hands. Use caution when operating power tools and always ensure proper ventilation in your work area. Dispose of construction waste responsibly, following local regulations.
Following these detailed plans will allow for the construction of a high-quality, durable picnic table with built-in benches. Careful attention to detail during each step of the process is essential to ensuring a successful and long-lasting project. Remember that slight adjustments to the dimensions may be necessary depending on your specific needs and available materials. Always prioritize safety and accurate measurements throughout the construction process.


0 comments:
Post a Comment